One Room Challenge
It’s said that you can put lipstick
on a pig, but it’s still a pig.
GUESS WHAT?!
My hall bathroom is the ‘pig’!
I did what I could to make it better, but when I recently learned of the One Room Challenge, I decided it was time to remove the lipstick and turn this pig of a room into something pretty. It is LONG overdue!
The ORC is hosted by Linda Weinstein from Calling It Home. It’s currently in its eleventh season. Twenty designers were invited to participate in this 6-week challenge, along with any willing guest participant with a blog. Although our blog is in its infancy, I thought it was a great push to not only redo the eyesore we live with, but it’ll also allow me to share a personal project of mine with you!
Ready or not…here we go!
THE GOAL
The goal is to start and finish one room within 6-weeks, document our progress and share the final reveal on May 11.
I’ve chosen to redo the hall bathroom my kids use. We have a big celebration in June, as my middle daughter graduates high school, and family is coming in to share in the event. This boosted my reason to move forward with my plan. And while I just decided to take this challenge on a few days ago, I got busy laying out all my ideas and details.
Side note: With any remodel or renovation…always start with a plan! It saves you time and money.
Time to show you the room…and I feel like I should add a disclaimer here…as a designer, it’s a bit embarrassing to admit how long we’ve lived with this room like this. (OK…it’s more than a bit!) I have other room that need desperate love too, but those will come in time…or during another ORC challenge. wink wink.
Here It Is…WEEK 1…the pig with lipstick on it.

ORC Hall Bath
First off, I can’t stand how the door opens up into the hallway! It can be dangerous in the dark. If you come around the corner and aren’t paying attention, you’ll smack right into it. See how it doesn’t lay flat against the wall? This will finally be fixed! Yippee!

ORC Hall Bath – sink wall
This photo shows how cozy the bathroom is. It’s only 5′ x 8′.
When we had all three kids using it, it took some juggling. Now that our oldest is away at college, it’s not so cramped.
Storage is key in small spaces…and that’s what I’m going to improve on, along with the overall style of the room. All that you see here is original to the house which was built in 1989. I’m sure it was as ugly then as it is now.
Several years ago, I did paint the cabinets and walls, plus updated the mirror and light fixture…that was the lipstick.

ORC Hall Bath Vanity
This beauty is just plain gross to me. While paint helped for a while, it never fixed what’s truly wrong with it. At the base of the cabinet, the particle board is disintegrating. The storage in this cabinet could be functional, but it’s not.
Time to go!
And you can see how the beautiful linoleum floor has a fabulous variated color to it. You could call it a natural “linoleated patina”. (I made that term up.)

ORC Hall Bath Shower/Tub
Is this from the 80s or what? Yep! And it’s going to be removed next week! I just watched a video on how to do that. All you need is a reciprocating saw and some excitement to demo. My son’s real excited to help with this part, especially when I said the word “power tool”.

ORC Hall Bath floor
This is our really, really nasty floor. It’s torn, discolored and won’t ever EVER come clean. That corner is the worst and no scrubbing, bleach or industrial cleaner can fix that. I’ve tried.
Removing this layer will bring me such joy!
The Plan
Our scope of work is pretty extensive for this little space. It’s a total gut job!
I am pretty excited though because I absolutely love renovations! I love taking a space that doesn’t function well and turning it into a gem. Just typing this out for you, to help you catch our vision, is making me giddy.
Here’s our plan…
- Gut the whole thing, down to the studs.
- Build a wall to form the new shower and open shelf area.
- Build a shower pan.
- Tile the floor and shower.
- Tile walls or cover with cultured marble…to be determined.
- Install new shower slider and shower set.
- Replace vanity, toilet, mirror, and light fixture.
- Decide upon wall treatment.
- Replace door with a pocket door.
- Trim out and paint.
- Build the floating shelves and install.
- Add the finishing touches.
INSPIRATION
I researched a lot of different bathrooms and found many elements that I liked. I pulled my favorites together for this hall bathroom, based on style, functionality, and price. This is not our “forever home”, and because of that, I’m being careful with what I select. I never want to spend more than we’ll see in ROI. I tend to play it safe with materials and details for jobs like this, instead of getting too customized with my own personal tastes. In the back of my mind, I always think “resell”.
That being said…
Here’s what I put together. I’ll talk these over with my family to see what they are drawn to most. And if you have an opinion, I’d love to hear your thoughts too.
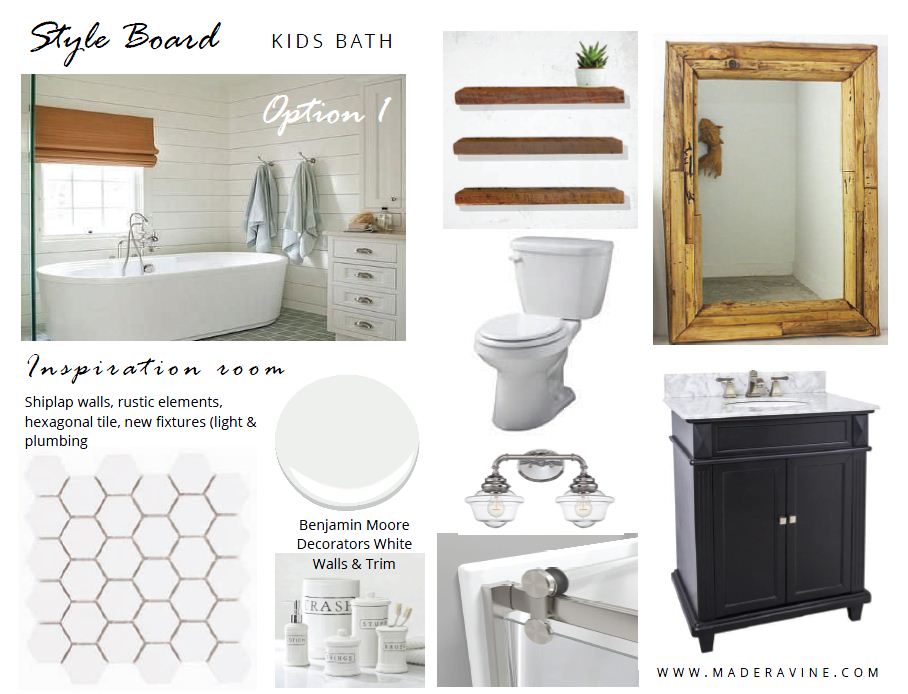
Option 1

Style Board Option 1 for ORC Spring 2017
I like the shiplap for this room because it will hide a lot of issues. Plus, the texture will make the room more interesting.
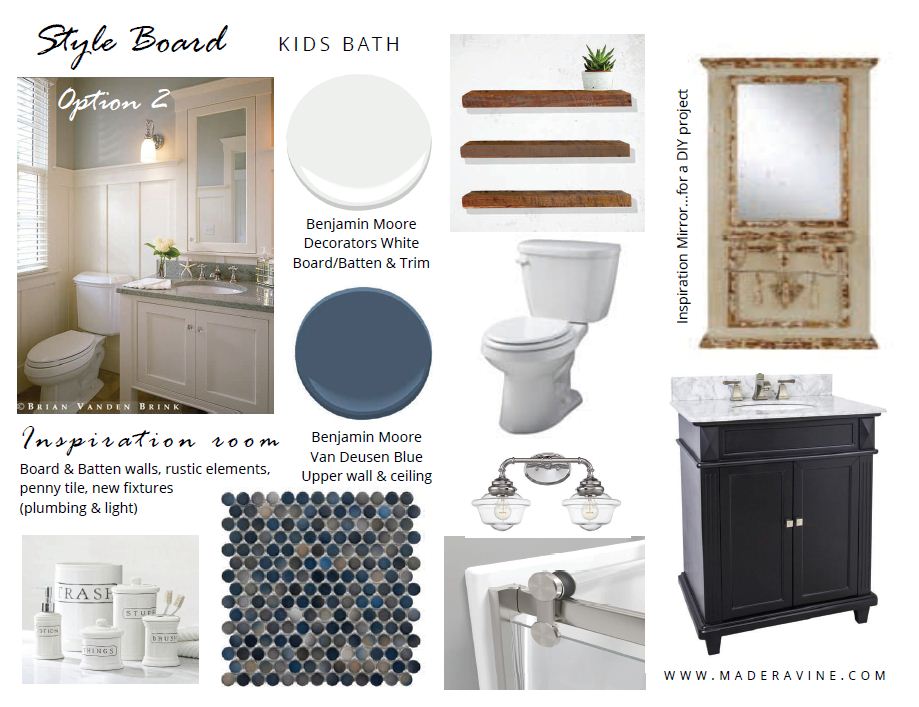
Option 2

Style Board Option 2 for ORC Spring 2017
Another option I like is using board and batten. And I’m in love with the penny tile! I could also do that in white, but the multicolor blue is so interesting! What do you think?
Well, that’s about it as we kick off Week 1!
Before next Thursday, we’ll fine tune our budget, and I’ll contact vendors to start making purchases. We’ll also begin demoing the hall bath. We’ll need a little help with plumbing and possibly the shower pan, but we do plan on doing the majority of the work ourselves. Oh, how I love using power tools!
It’ll be a fun project, one that is way overdue!
I can’t wait to show you our progress.
As we go along, if you have any questions on the work we’re doing in our hall bath, design choices I make, or simply want to share an encouraging word…please comment below.
Also, be sure to check out all the other fabulous ORC makeovers here. You’ll definitely be inspired!
Say bye-bye to the ugly hall bath, and HELLO to what’s coming!
Talk soon,


I love that blue variegated penny tile! I’m for board and batten. Looking forward to your progress, and good luck!
I do to Amy! I can’t wait to see it in person. I’ll head down to that store this week to pick it up. I like the board and batten too. We did some in our mud room, so it’d tie in nicely. My daughter is leaning the other direction with shiplap. We may have to flip a coin. 😉
Both are great options, I’m especially drawn to the blue penny tile, though. Good luck with it. I’m impressed you’re doing mist of it yourself!
Thank you Joan, we’re drawn to the blue penny tile too. It looks like a necklace I have.
Looks great, I think I love option 1, the shiplap and the hexagons are georgeous!
Thank you Dannyelle,
I love your name! I have a friend named Dayne Lynn. You’re name reminds me of her. I like the hexagons too. Based on my daughter’s input, we’ll probably be mixing the two styles. The end result will be a winner no matter what. 🙂
I think your hard work will pay off! Can’t wait to see this space come to life 🙂
Thank you Ariel, I appreciate the confidence! 🙂 I can’t wait to see it too. We had a little set back when my husband took a fall down the stairs, but we’ll adjust as we need to.
I like option one!!! Good luck in the challenge! It’ll be worth it!
Thank you Colette, I appreciate your encouragement! It will definitely be worth it!
10 Comments